

3D PRINTED TOOLS FOR THE WORKBENCH + PORTABLE ANTENNAS
by Dennis Gregory (WU6X)
I’ve been having a great time 3D printing all sorts of things for the home, for gifts, toys, figurines, puzzles, and even some practical items. Two such practical items I’ve come across, I’ll describe here, and include the links to the 3D files at the end.
I’m sure you’ve been in a situation where you needed to solder two wires, end-to-end,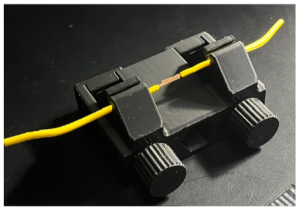 sometimes of different diameters. If you were like me, you end up chasing the wires around the bench, using the Vulcan handshake and a juggling act to finally get them together … then start over when you find that the connection isn’t quite what you wanted. So … I 3D printed this double-vise which will independently hold each wire, no issues with diameter.
Problem solved! I get a perfect splice every time and can slip a piece of shrink tubing over the tag end. So easy, even a caveman can do it!
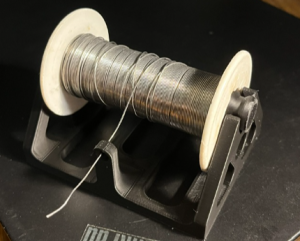 The other workbench tool I found is a solder roll caddy. This can be easily resized to fit your particular roll, and makes getting and finding the end so much easier than chasing that around the workbench as well. So, there you have my two 3D prints for the workbench.
But wait, there’s more, as they say. I found another very handy little gadget I’m using when guy-wiring antenna masts, tents, and end-fed wires. Often called “wire tensioners”; I use two types: the “Loop Alien” and the “Seahorse”.
The Loop Alien is very strong and easily repositioned to remove slack in the guy wire. I 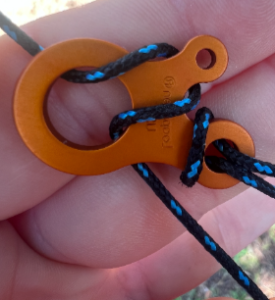 noted Jon and Derek were using these at Field Day to tension the guys on the giant multi-band vertical. The only issue I have with this type of tensioner is it can be challenging to use. But once in place, they work incredibly well.
I’ve included Jon’s instructions on how he uses them.
1. Tie the guy rope to the middle size of the 3 loops
2. Wrap it around whatever anchor you have (e.g., a carabiner on your anchor stake). Now you have 2 sides on either side of the anchor; one (short side) is attached to the loop from #1 above. The other (long side) goes to your antenna mast, long wire, etc.
3. Adjust the side lengths so you’re somewhat close to being tensioned but still quite loose.
4. Make a 2 to 3 inch “U” in the long side by pinching some between your fingers. Put that U through the largest hole in the Loop Alien.
5. Wrap the tip of the U back over the smallest loop section of the Loop Alien. At this point, it should look like the picture.
From there you can tension as you see fit. It will be easier to loosen than to tighten, so if you have trouble tightening it, you can (with one hand) manually pull on the rope going to the mast to get you some slack and then slide the Loop Alien “up the guy line” to take up the slack. By moving the Loop Alien up and down the guy line you can easily achieve the desired tension. These are in-expensive to 3D print in PETG. Also, check out the “Seahorse” rope tensioner. The Seahorse is easier to use and still does a great job of adjusting tension, especially if the anchor is a loop around a tree or stake.
Sources:
Double Vise: https://makerworld.com/en/models/2064457-solder-wire-holder?from=search#profileId-2229275
Solder Spool Holder: https://makerworld.com/en/models/24087-han-xi-jia-solder-
holder?from=search#profileId-21334 (Resize to fit your particular spool of solder)
Loop Alien: https://makerworld.com/en/models/1188137-rope-tensioner?from=search#profileId-1199445